Flare-On 11, The Journey of Deobfuscating Serpentine 🐍
Foreword
The Flare-On Challenge is a single-player series of Reverse Engineering challenges, some of which are inspired from real-world problems faced by the mandiant team during their malware analysis work, that runs for 6 weeks every fall.
Mandiant organized the 11th edition of the annual Flare-On challenge this year and needless to say, it definitely does not disappoint once again.
Despite my busy schedule admist work and school, I was able to find just enough time to complete Flare-On once again this year, despite the not so satisfactory placing on the leaderboard.
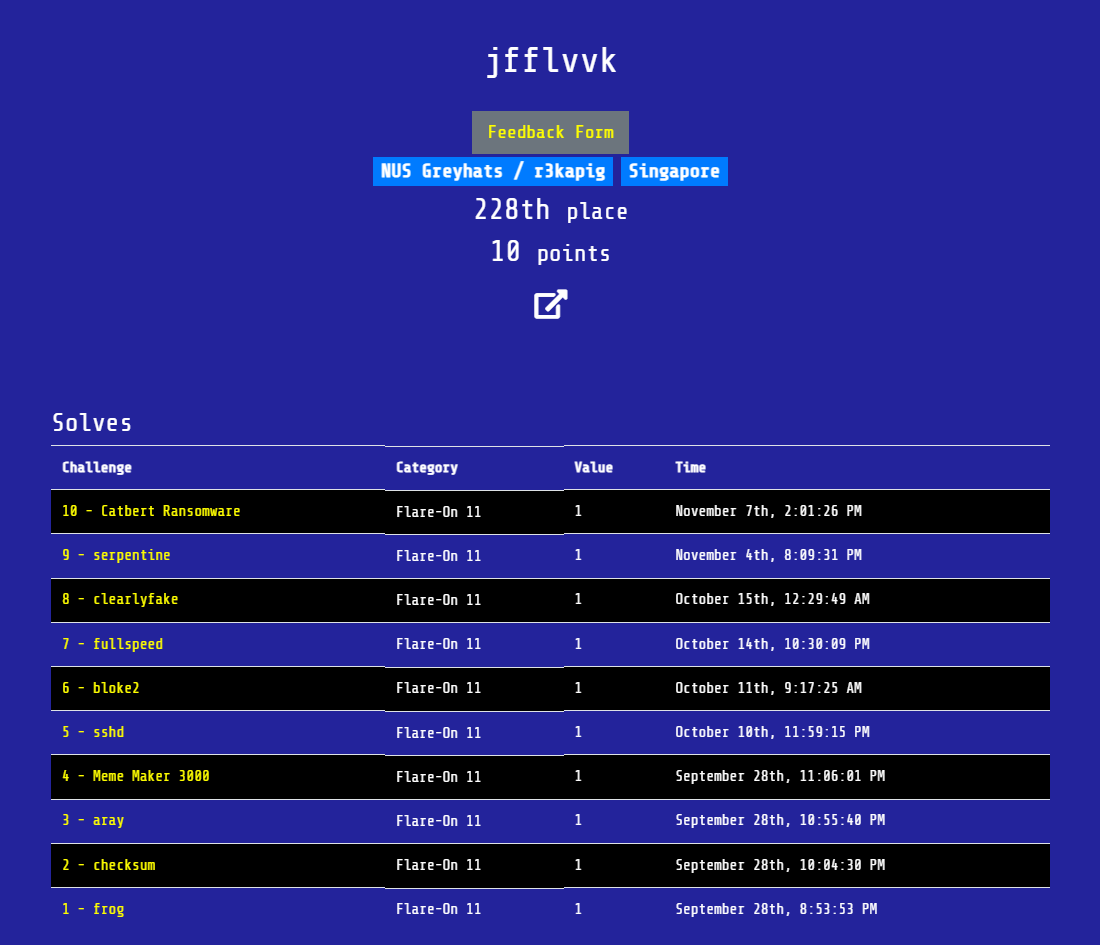 you can tell the periods when i became too pre-occupied with life from the big gaps in the solve timing XD
I hope to be able to allocate more time and try to solve it much faster next year. Flare-On will remain as something that I look forward to working on every year :)
Introduction
This year’s Flare-On consisted of 10 levels of reverse engineering challenges.
The hardest challenge for this year is unarguably level 9, Serpentine, which is a heavily obfuscated windows executable that utilizes a series of exceptions to obfuscate the program code.
This writeup walks through my journey of attempting to solve this challenge by attempting to fully deobfuscate and eventually decompile the program code.
- Understanding the Program
- Analyzing the Obfuscation Technique
- Deobfuscating the Program, to the point of some decompilation
Was it really necessary to do so much to solve this challenge?
Most available FlareOn 9 writeups feature some form of assembly tracer that pulls the constraints from parsing the assembly code. This was certainly the most feasible and time-efficient path for this challenge which simply contains a bunch of repetitive simple arithmetic operations.
However, if the program functionality was anymore complex, it would make sense to attempt to deobfuscate and decompile the program. More than that, we can do it in the spirit of learning and also because I think it’s fun :)
Before you read any further, I strongly encourage you to first read my previous post: A deep dive into modern Windows Structured Exception Handling. This will be essential to understand the obfuscation techniques employed by this challenge.
Understanding the unobfusacted parts of the Program
Much of the readable and unobfuscated program code happens in the pre-main functions. Without going into much detail, pre-main code in this program are stored in the TLS Callback function and constructor functions.
API Resolution of RtlInstallFunctionTableCallback
A series of constructor functions are defined to do the following:
- Walk the PEB to get ntdll base address
1
2
3
4
5
6
_QWORD *__fastcall sub_140001660(_QWORD *a1)
{
  memset(a1, 0, 0x2A08uLL);
  a1[1345] = NtCurrentTeb()->ProcessEnvironmentBlock->Ldr->InMemoryOrderModuleList.Flink->Flink[2].Flink;
  return a1;
}
- Parse the ntdll PE headers to dynamically find and resolve the
RtlInstallFUnctionTableCallbackfunction
1
2
3
4
5
6
7
8
9
10
11
12
13
14
15
16
17
18
19
20
21
22
23
24
25
26
__int64 sub_140001270()
{
  DWORD i; // [rsp+0h] [rbp-68h]
  _IMAGE_EXPORT_DIRECTORY *ntdll; // [rsp+8h] [rbp-60h]
  _BYTE *v3; // [rsp+10h] [rbp-58h]
  _IMAGE_EXPORT_DIRECTORY *optional_headers; // [rsp+38h] [rbp-30h]

  ntdll = qword_1408A3310[1345];
  optional_headers = *(&ntdll[3].Base + ntdll[1].NumberOfFunctions);
  for ( i = 0; i < *(&ntdll->NumberOfFunctions + optional_headers); ++i )
  {
    v3 = ntdll + *(&ntdll->Characteristics + 4 * i + *(&ntdll->AddressOfNames + optional_headers));
    if ( *v3 == 'R' && v3[3] == 'I' && v3[10] == 70 && v3[18] == 84 && v3[23] == 67 )
    {
      RtlInstallFunctionTableCallback = (ntdll
                                       + *(&ntdll->Characteristics
                                         + 4
                                         * *(&ntdll->Characteristics
                                           + 2 * i
                                           + *(&ntdll->AddressOfNameOrdinals + optional_headers))
                                         + *(&ntdll->AddressOfFunctions + optional_headers)));
      return 0LL;
    }
  }
  return 0LL;
}
- Call the
RtlInstallFunctionTableCallbackfunction to installcallback_funcwhich will be invoked when handle exceptions that happen atlpAddress.
1
2
3
4
5
6
7
8
9
10
__int64 sub_140001430()
{
  // function declaration
  // void (__fastcall *RtlInstallFunctionTableCallback)(__int64, _QWORD, __int64, _QWORD, _QWORD, _QWORD);

  RtlInstallFunctionTableCallback = RtlInstallFunctionTableCallback;
  if ( RtlInstallFunctionTableCallback )
    RtlInstallFunctionTableCallback(lpAddress | 3, lpAddress, 0x2E4D26, callback_func, 0, 0);
  return 0LL;
}
Essentially, the constructor dynamically resolves the RtlInstallFunctionTableCallback function, and calls it to install a callback function that will dynamically return a RUNTIME_FUNCTION entry that is used to determine the actions to be taken during an exception.
Allocating the Shellcode
TlsCallback_0 function is simple. It allocates rwx memory and copy the shellcode into the allocated memory buffer.
1
2
3
4
5
6
7
8
9
10
11
12
13
14
15
16
17
18
void __fastcall TlsCallback_0(PVOID DllHandle, DWORD dwReason)
{
  if ( dwReason == 1 ) // on program startup / thread creation
  {
    shellcode_addr = VirtualAlloc(0LL, 0x800000, MEM_RESERVE|MEM_COMMIT, PAGE_EXECUTE_READWRITE);
    if ( !shellcode_addr )
    {
      puts("Unable to allocate memory.");
      exit(1);
    }
    memcpy(shellcode_addr, obfuscated_shellcode, 0x800000uLL);
  }
  else if ( !dwReason && !VirtualFree(shellcode_addr, 0, MEM_RELEASE)) // on program exit / thread ex it
  {
    puts("Unable to free memory.");
    exit(1);
  }
}
Main Function
Finally, after pre-main functions have been executed, the main function will run.
As shown below, the function is very straightforward
- It checks that the input provided is exactly 32 bytes long, and stores it in a global buffer.
- The shellcode that is allocated in the constructor is executed.
1
2
3
4
5
6
7
8
9
10
11
12
13
14
15
16
17
18
19
20
21
22
23
int __fastcall main(int argc, const char **argv, const char **envp)
{
  SetUnhandledExceptionFilter(TopLevelExceptionFilter);
  if ( argc == 2 )
  {
    if ( strlen(argv[1]) == 32 )
    {
      strcpy(flag, argv[1]);
      (lpAddress)(flag);
      return 0;
    }
    else
    {
      puts("Invalid key length.");
      return 1;
    }
  }
  else
  {
    printf("%s <key>\n", *argv);
    return 1;
  }
}
This means that most of the actual program functionality likely lies in the executed shellcode.
Analyzing the Obfusaction Technique
Looking at the shellcode, it seems to contain a hlt instruction and nothing more.
Upon running a hlt instruction, our program would raise an exception since hlt instructions are not intended to be executed in user mode.
6A50000: Priveleged instruction (exc.code c0000096, tid 4504)
It is not immediately obvious about how the program is handling the exception, or even what happens in the program at all after raising the exception.
However, by running the program, we can be sure that there is some user code that is actually being ran even after the exception since the program eventually prints “Wrong key” and exits.
Exception Handling
Control Flow Obfuscation
When the hlt instruction is executed, an exception is raised. This will invoke the Windows Kernel Exception Dispatcher, nt!KiUserExceptionDispatcher, to look for an appropriate exception handler to it.
- There is no
AddExceptionVectoredHandlerwhich would install a VEH handler. - Since this is a dynamically allocated shellcode, there is naturally no pre-compiled
RUNTIME_FUNCTIONentry for the shellcode. - As such, our program will call the callback_func that was defined earlier via the call to
RtlInstallFunctionTableCallbackto get the correspondingRUNTIME_FUNCTIONentry.
1
2
3
4
5
6
7
8
9
10
11
PRUNTIME_FUNCTION __stdcall callback_function(DWORD64 ControlPc, PVOID Context)
{
  RUNTIME_FUNCTION *entry;

  entry = operator new(0xCuLL);
  entry->FunctionStart = (ControlPc - lpAddress); // lpAddress here is the address of the dynamically allocated shellcode
  entry->FunctionEnd = entry->FunctionStart + 1;
  entry->UnwindInfo = entry->FunctionEnd + *(ControlPc + 1) + 1;
  entry->UnwindInfo = (entry->UnwindInfo + ((entry->UnwindInfo & 1) != 0));
  return entry;
}
The callback function sets the FunctionStart and FunctionEnd to the corresponding offset of where the exception was raised, which means that the returning RUNTIME_FUNCTION entry will be the appropriate entry to handle this exception.
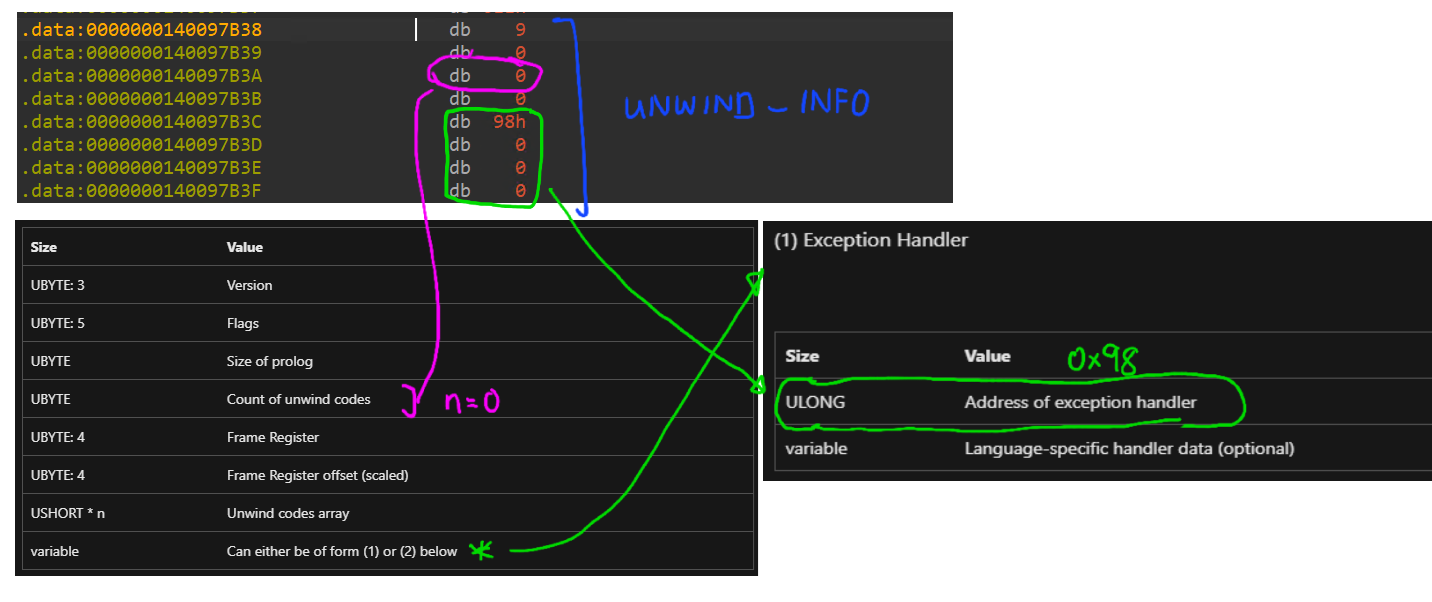
The UnwindInfo holds the offset to the UNWIND_INFO struct that contains data about how the exception should be handled.
Here’s the equivalent python snippet that would derive the address of the UNWIND_INFO struct:
1
2
unwind_info_address = hlt_address + shellcode[hlt_address+1] + 2
unwind_info_address += int((unwind_info_address & 1) != 0) # round up to an even number / to be WORD aligned
1
.data:0000000140097B38                 UNWIND_INFO <1, 1, 0, 0, 0, 0, <98h, 0, 0>>
Following the definition of UNWIND_INFO struct on MSDN, we can quickly identify the address of the next block of user code to be executed (aka the exception handler).
As we continue to analyze the code, we can realize that most of the control flow of the code is obfuscated in this manner, with the use of exceptions.
Naively, we can try to writeup a deobfuscation script that walks through the code linearly, parse the UNWIND_INFO struct, patch the hlt into a jmp to the next block of “exception-handling” code.
CONTEXT
After recovering from an exception and within the exception handler, the state of the registers from before the exception has been totally clobbered in the process of recovering from the exception.
In order to deal with this, the exception handling function actually takes in the DISPATCHER_CONTEXT struct in its 4th argument (the r9 register) and the CONTEXT struct containing the registers at the point where the exception was raised.
1
2
3
4
5
6
7
8
9
10
11
12
13
typedef struct
{
    ULONG64               ControlPc;
    ULONG64               ImageBase;
    PRUNTIME_FUNCTION     FunctionEntry;
    ULONG64               EstablisherFrame;
    ULONG64               TargetIp;
    PCONTEXT              ContextRecord; // offset 0x28
    void* /*PEXCEPTION_ROUTINE*/ LanguageHandler;
    PVOID                 HandlerData;
    PUNWIND_HISTORY_TABLE HistoryTable;
    ULONG                 ScopeIndex;
} DISPATCHER_CONTEXT;
As a result, the subsequent blocks of code (after recovering from the exception) actually references from these structs and ends up looking something like that
1
2
3
4
mov rdx, qword ptr [r9 + 0x28]>  // RDX = Dispatcher->ContextRecord
ldmxcsr dword ptr [rdx + 0x34]>  // mxcsr = RDX->mxcsr
mov r13, qword ptr [rdx + 0xf0]> // R13 = RDX->r15
mov rdi, qword ptr [rdx + 0xe0]> // RDI = RDX->r13
In order to get a decompilation, we have to resolve these references to the Context struct after stitching the hlt together with a jmp.
We can essentially patch the above assembly to something like this…
1
2
mov r13, r15
mov rdi, r13
BUT, this is wrong! If you noticed, r13 was overwritten by r15 while rdi is overwritten by the OLD r13.
In this case, there is two R13 values which is the one that is being updated and the one from the previous block of code.
In order to resolve this, we have to keep track of unused registers and store the OLD r13 into the unused register.
1
2
3
4
// let r9 be our unused register
mov r9, r13
mov r13, r15
mov rdi, r9 // now this will move the original r13 into rdi
In my deobfuscation script, I made use of plenty of regexes and hacky patching in order to resolve all the CONTEXT references.
Unwind Codes
There’s actually still more to the exception handling process than it seems. In my previous blog post, I mentioned that exception handlers can optionally include an array of UnwindCode which runs a set of instructions that does modification to the registers.
This meant that our registers in the CONTEXT structs were actually being modified through these unwind codes. In order to properly remove the exceptions and stitch all the code blocks together, we will have to manually parse the unwind codes and translate them into equivalent assembly instructions.
Because I was stubborn and refused to constantly store a CONTEXT struct in between every block of code (i felt like it would make decompilation uglier), this made the parsing of unwind codes rather complicated.
Let’s look at an example,
1
2
3
4
5
6
7
8
9
case UWOP_PUSH_MACHFRAME:
    /* OpInfo is 1, when an error code was pushed, otherwise 0. */
    Context->Rsp += UnwindCode.OpInfo * sizeof(DWORD64);

    /* Now pop the MACHINE_FRAME (RIP/RSP only. And yes, "magic numbers", deal with it) */
    Context->Rip = *(PDWORD64)(Context->Rsp + 0x00);
    Context->Rsp = *(PDWORD64)(Context->Rsp + 0x18);
    ASSERT((i + 1) == UnwindInfo->CountOfCodes);
    goto Exit;
If we were to naively remove the CONTEXT registers and translate them into the equivalent assembly, it would translate into this:
1
2
3
add rsp, 8
mov rip, [rsp]
mov rsp, [rsp+0x18]
which is totally wrong…
When values are modified in the Context, it does not mean that the actual registers are modified.
In order to understand the effect of the unwind code on the actual assembly, we will need to understand how the challenge author made use of these unwind codes.
| unwind code | purpose |
|---|---|
| UWOP_PUSH_NONVOL | pop a register from the stack |
| UWOP_ALLOC_LARGE | add a value to RSP |
| UWOP_ALLOC_SMALL | add a value to RSP |
| UWOP_SET_FPREG | RSP = some register |
| PUSH_MACHFRAME | RSP = *(RSP+ some_value) |
After hours of staring at the unwind codes and the following assembly code in the next block / exception handler, I have concised the unwind code into the following equivalent assembly code
1
2
3
4
5
6
7
8
if count_of_codes:
    unwind_instructions = []
    if REG_USED:
        unwind_instructions.append(ks.asm(f"mov {FINAL_REG}, {REG_USED}")[0])
        unwind_instructions.append(ks.asm(f"mov {FINAL_REG}, [{FINAL_REG}+{OFFSET}]")[0])
    elif RSP_DEREFED:
        unwind_instructions.append(ks.asm(f"mov {FINAL_REG}, [rsp+{RSP_DEREF_OFFSET}]")[0])
        unwind_instructions.append(ks.asm(f"mov {FINAL_REG}, [{FINAL_REG}+{OFFSET}]")[0])
Essentially, the unwind code is simply used to obfuscate memory accesses :p
Self-Modifying Shellcode
Apart from the exception based obfuscation, the user code also contains self-modifying shellcode that decrypts its own instruction at runtime. The self-modifying shellcode results in something that looks janky like this.
1
2
3
4
5
6
7
8
9
10
11
.data:0000000140097B88                 call    loc_14037C817
.data:0000000140097B8D                 jg      short loc_140097B5E
.data:0000000140097B8F                 and     eax, 5341ABC6h
.data:0000000140097B94                 push    73775436h
.data:0000000140097B99                 push    68A04C43h
.data:0000000140097B9E                 push    12917FF9h
.data:0000000140097BA3                 call    loc_14037C886
.data:0000000140097BA8                 mov     ebp, 0E81D7427h
.data:0000000140097BAD                 db      3Eh, 2Eh
.data:0000000140097BAD                 add     [rdi+3EB80D02h], dl
.data:0000000140097BB6                 retnq   4932h
If we look closer, we notice that each of the call instructions effectively decrypts and runs a single instruction. The decryption routine pretty much looks identical like this:
- It pops the return address into the return routine of the current decryption stub
- It decrypts the instruction by
- reading a byte from another location in memory
- adding a constant – 0x7f497049 in this case
- writing the result into the encrypted instruction
- run the decrypted instruction
- It re-encrypts the instruction
- It returns by moving the previous return address back to the top of the stack
The shellcode is littered with such similar decryption routines that decrypt and runs a single instruction.
In order to properly reverse-engineer this shellcode, we will need to decrypt the instruction ourselves and overwrite the call into the decryption routine with the decrypted instruction.
Putting together a deobfuscation script
The final deobfuscation script was written in IDAPython (alternatively, everything can be easily substituted out with keystone and capstone) and can be found here.
note: the amount of pain that went into writing all that hacky code and unreadable code is ><’
Our final deobfuscation script will aim to achieve the following by statically ‘emulating’/’tracing’ the code in a python script.
- Patching away all self-modifying decryption routine with the decrypted instruction
- Stitch all the
hltinto ajmpinto the next routine - Patch away reference to all
Contextstructs with the actual corresponding register- in the case that the block of code uses both
Context->regandreginterchangeably, we have to keep a copy of theContext->regcontents so that the value is not destroyed
- in the case that the block of code uses both
- Convert the
UnwindCodes into equivalent x86 instructions
This resulted in a very hacky script that managed to deobfuscate but does not run correctly. (i actually don’t know why it doesn’t run correctly, but i’d be more surprised if it did considering the amount of hacky stuff i did)
Nevertheless, it was sufficient to get a semi-readable decompilation.
Making the decompilation more readable
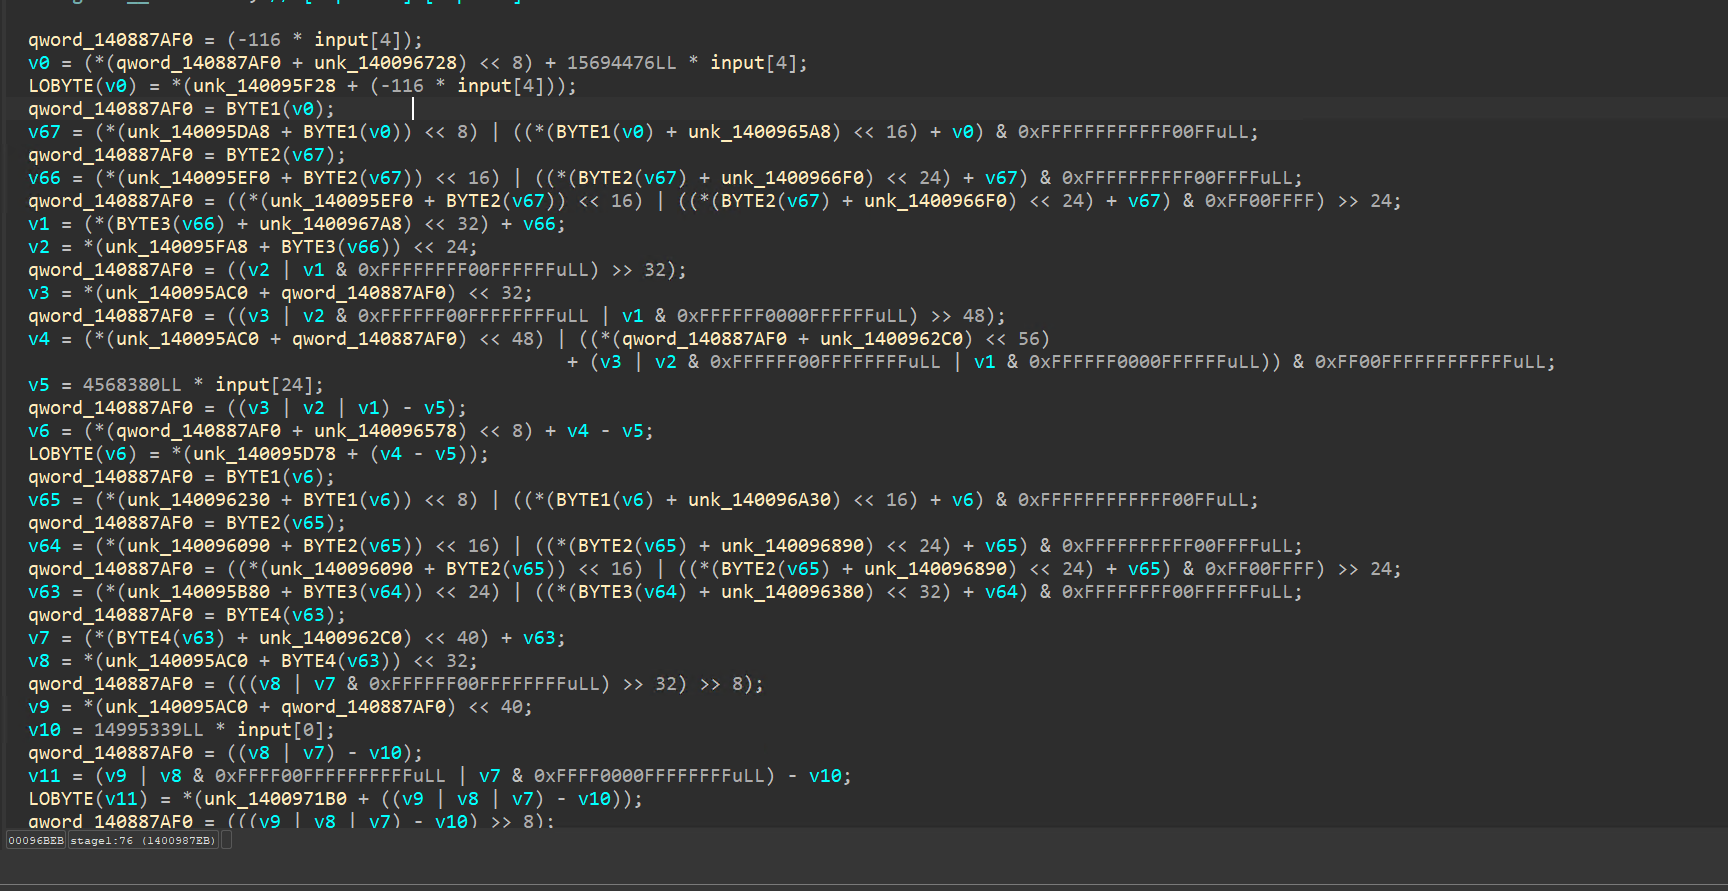
After deobfuscating, we managed to obtain some form of decompilation that looks like this:
The code is littered with memory accesses, bit masking amongst other things.
If we look into the memory that the program is accessing and debug the program a little, we end up realizing that its essentially making use of lookup table to carry out basic operations like – addition, subtraction, XOR, OR.
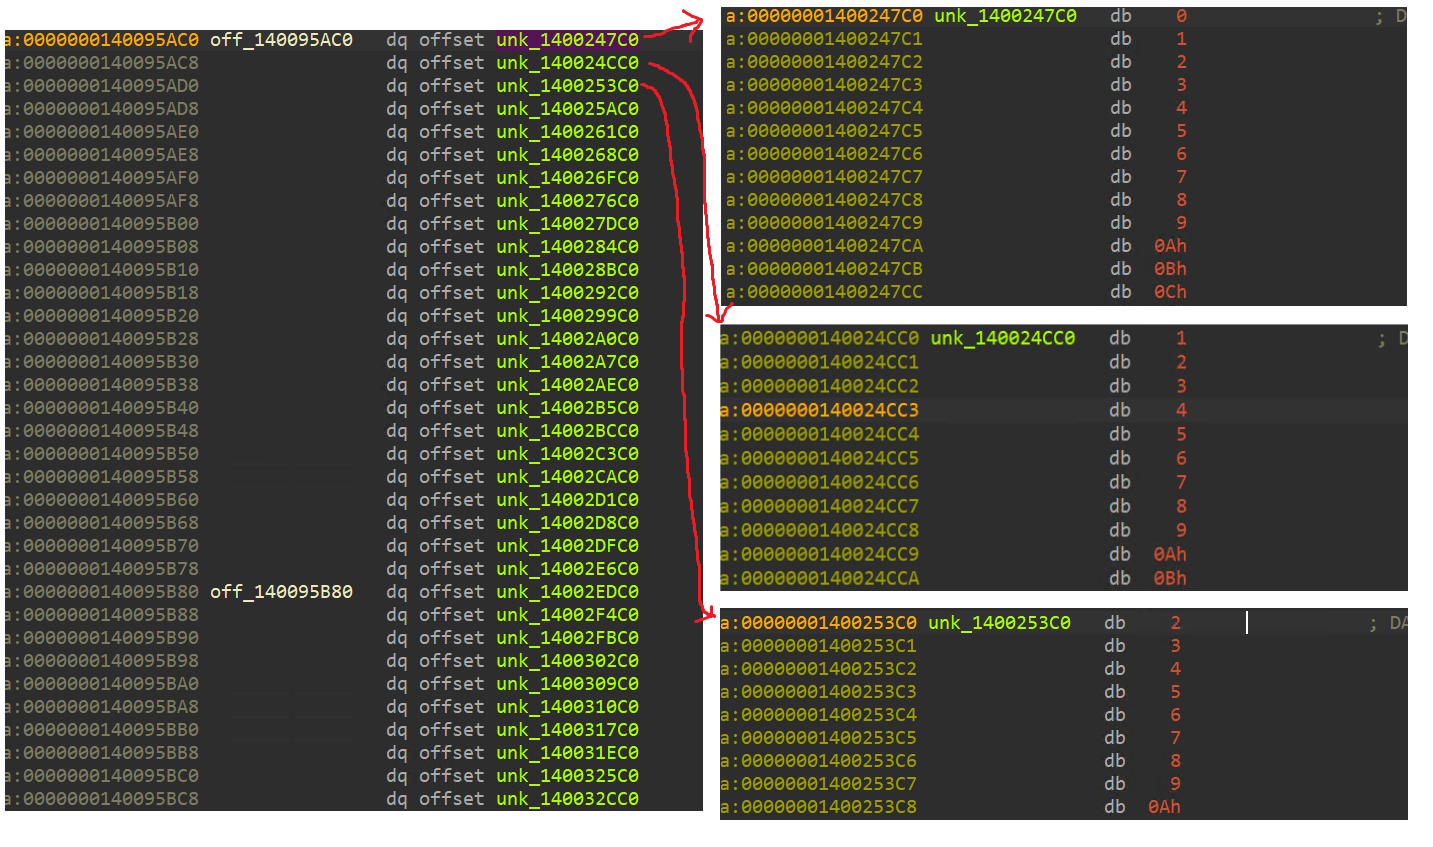 lookup table for the addition operation
In order to do a one-byte addition, we can do addition_lookup_table[12][34] to obtain the result of 12+34. There’s also an overflow lookup table to check if there is an overflow for the one-byte addition that will go into the addition for the next byte (LSB to MSB addition).
In order to make the decompilation more readable, we can rename the lookup tables so that it shows up nicely in the decompilation.
1
2
3
4
5
6
7
8
9
10
11
12
13
14
15
16
17
18
# give sane symbol names
xor_table = 0x140094AC0
or_table = 0x1400952C0
addition_table = 0x140095AC0
overflow_table = 0x1400962C0
subtraction_table = 0x140096AC0
underflow_table = 0x1400972C0
tables = [xor_table, or_table, addition_table, overflow_table, subtraction_table, underflow_table]

for i in range(256):
    for j in tables:
        idc.create_qword(j+i*8)
    idc.set_name(xor_table+i*8, f"xor_table_{hex(i)[2:].zfill(2)}")
    idc.set_name(addition_table+i*8, f"addition_table_{hex(i)[2:].zfill(2)}")
    idc.set_name(subtraction_table+i*8, f"subtraction_table_{hex(i)[2:].zfill(2)}")
    idc.set_name(underflow_table+i*8, f"underflow_table_{hex(i)[2:].zfill(2)}")
    idc.set_name(overflow_table+i*8, f"overflow_table_{hex(i)[2:].zfill(2)}")
    idc.set_name(or_table+i*8, f"or_table_{hex(i)[2:].zfill(2)}")
We end up with the following nicer decompilation which we can see some operations being done
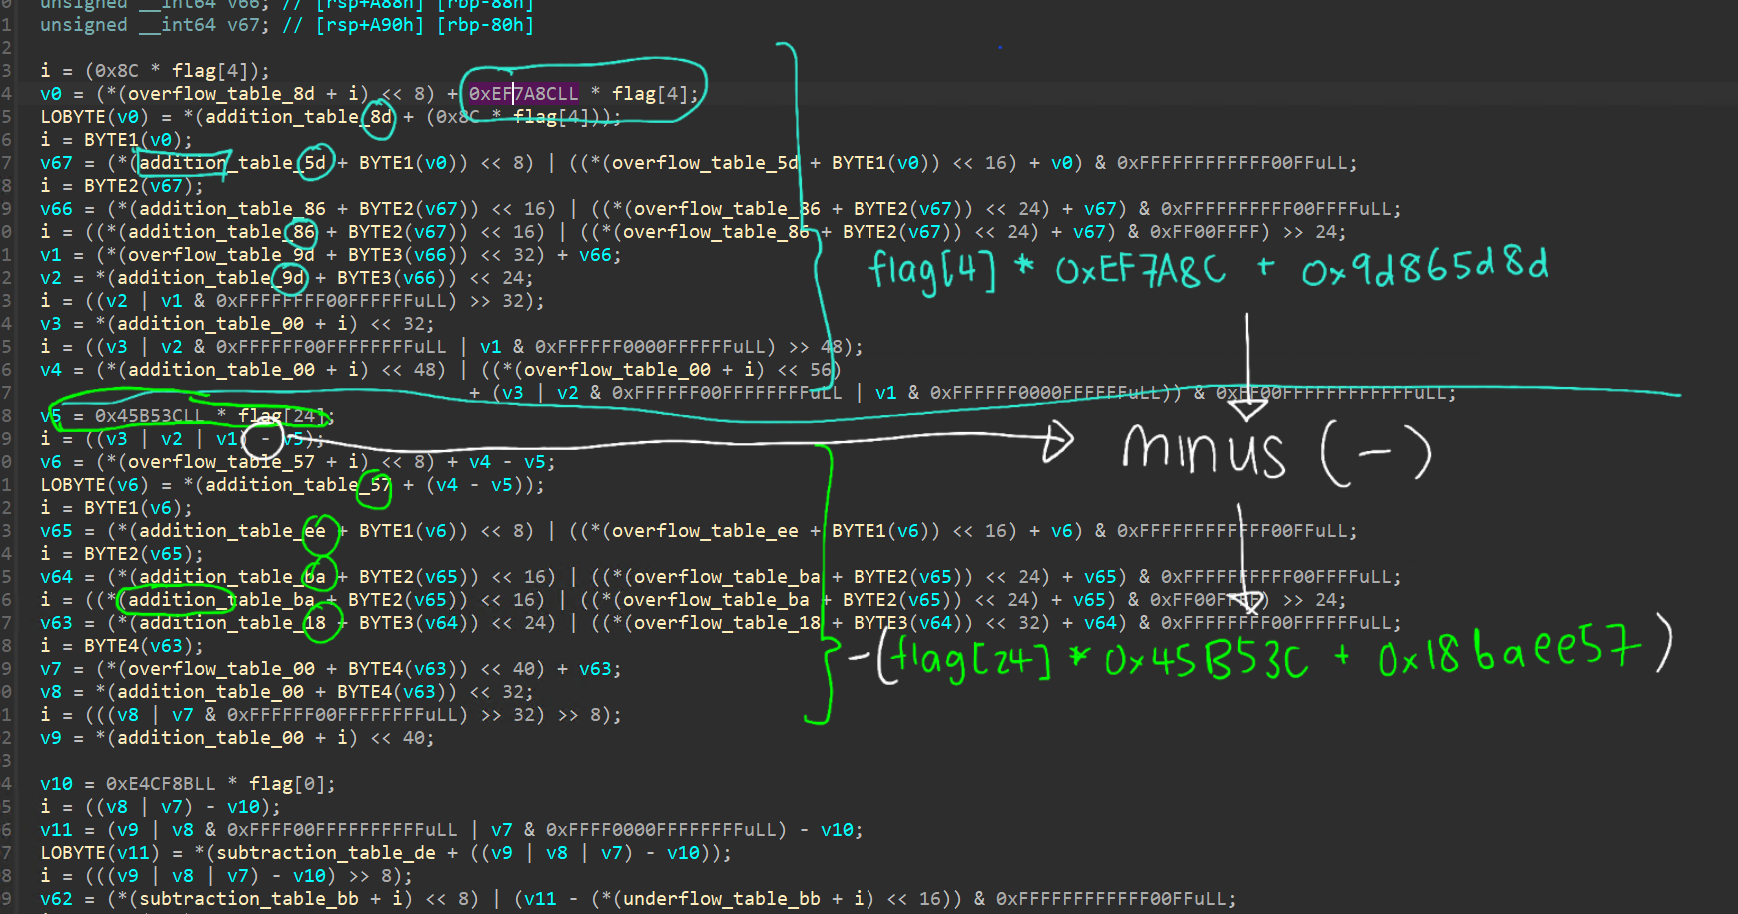 shows the result of two operations being pieced together
For the first function, we can retrieve a set of operations as follows
1
2
3
4
5
6
7
8
9
10
11
12
13
14
15
16
17
a  = flag[4] * 0xef7a8c
a += 0x9d865d8d
a -= flag[24] * 0x45b53c
a += 0x18baee57
a -= flag[0] * 0xe4cf8b
a -= 0x913fbbde
a -= flag[8] * 0xf5c990
a += 0x6bfaa656
a ^= flag[20] * 0x733178
a ^= 0x61e3db3b
a ^= flag[16] * 0x9a17b8
a -= 0xca2804b1
a ^= flag[12] * 0x773850
a ^= 0x5a6f68be
a ^= flag[28] * 0xE21D3D
a ^= 0x5c911d23
s.add(a == 0xffffffff81647a79)
There’s a total of 32 functions, which means that we repeat the above 32 times to pull out all the equations and finally solve them to obtain the full flag. with lots of pain, trial and error
In hindsight, I should’ve simply pulled the constraints by walking the assembly XD
All the decompiled functions code can be found here.
Reflection
After the contest ended, I read through many of the other participant’s writeups and I actually have a few thoughts/reflections
- If the objective was simply speed, it would’ve been much faster to simply parse the disassembly directly to pull out the constraints for solving. Regardless, I chose this direction regardless because I wanted to fully understand how the obfuscation worked.
- I should’ve considered transpiling the relevant assembly code to let the compiler handle register allocation instead of doing my hacky method of parsing the assembly to find unused registers in a single block.
- I need to stop doing hacky stuff just because I’m lazy XD, there’s so much to be improved on in my script.
At the end of the day, the biggest difficulty of this challenge was truly to understand the full extent of the different obfuscation techniques employed in this one single executable. Discovering each new intricacy was a non-trivial process as everything seemed invisible and was not immediately obvious.
This challenge was an extremely humbling experience, and reading all the other more amazing writeups is truly awe-inspiring. Challenges like these are what continue to drive me to learn more and continue to participate in such contests.
Till next time!
other HIGHLY recommended amazing writeups
- https://github.com/stong/flare-on-2024-writeups/tree/master/9-serpentine
- she basically took everything that I wanted to do and did it 1000x better 🤯
- she wrote a compiler and a symbolic executor from scratch (>1000 LOC each)
- i aspire to reach this level of genius and dedication someday
- https://washi1337.github.io/ctf-writeups/writeups/flare-on/2024/9/
- lifting the assembly into equivalent C code and relying on the compiler to do register allocation is absolutely genius
- https://hshrzd.wordpress.com/2024/10/29/flareon-11-task-9/
- i’ve always wanted to improve my toolchain, and using a PIN tracer sounds really cool/interesting
- https://matth.dmz42.org/posts/2024/flare-on_11_9_serpentine/
- the one writeup that lifted the code and removed the lookup tables to eventually run Triton on it
- really cool idea!

